Monday, 27 December 2010

Creative Design Realisation: Week 1

During the first week the workshop was based on creating our own darts for our own benefit as well as making notes in order to fully understand darts in a way that i could understand. By practising darts a number of times by creating advanced darts helped me understand how create and move darts on a bodice. By drawing 8 designs that feature a facing, fullness and flare and dart manipulation helped me understand how to create a pattern from a drawing into a pattern by doing a step-by-step process of how i managed to create patterns for each of my eight design ideas.


Advanced Dart Manipulation


Shoulder dart and Side dart

Above is my drawing of one of the dart designs I want the dart to go on the should as well as at the side of the bodice.


I started off by drawing around the front half scale bodice block and the darts. I marked where I wanted the side dart to go from the bust point. I closed the bottom dart and then slashed open the new dart which can be seen above.


I then drawn around the new bodice shape with the new dart at the side as you can see from the photo above.


To create a final pattern i added a 0.5cm seam allowance as the final pattern was half scale.

2. Dart Into A Seamline


For this design I wanted to create a patter piece for this dart design idea above, as i wanted a dart going into the seam line.


As you can see I drawn around a half scale bodice front and then marked out where I wanted the new dart to go and closed the top dart so I could slash open the new curved in dart. I've drawn in a curved line between where the two darts meet as the bodice will become two separate pattern pieces now that I've changed it.

To this final pattern piece above i drawn around the two separate pieces and then added the 0.5cm seam allowance for the new half scale pattern.

Zips


Edge to Edge Zip

This is my sample of an edge to edge zip I found it a bit tricky to sew as I haven't sewn a zip for ages but managed to successfully create a good sample as you can see.

Concealed Zip


 This is my sample of a concealed zip I made as part of my development of being able to sew different zips.


Visible Zip


This is my sample of an visible zip, i found this the most hardest zip to do as the instructions weren't that straight forward to follow but i managed to finish off the zip in the end even though it took me ages to figure it out.

Skirt Fullness and Flair


Puffball Skirt


 I started off by drawing around a half scale front a-line skirt block and then pivoted over the dart to change the top shape of the skirt as you can see from the photo above. I then split the bottom of the skirt into three equal sections.


I then traced off the three sections I had marked out earlier ans then slashed the sections of the skirt up. I opened out the slashed pieces as far as I could the wider the slashed skirt the more volume created on a puffball skirt. Once I has happy with the size of it I then drawn around the new shape.

After I had drawn around the new shape I then added a 0.5cm seam allowance as the pattern piece was for half scale not full.

Creative Approaches To Fashion: Final Design Idea and Final Gament

Final Design Idea

This is the final design i decided to choose as it was one of favourite designs from the eight i designed.


Parts of garments i used and removed

To take my design forward i played around with the three shirts on a mannequin and tried to create my design idea using the three shirts. I had too much material so i decided to remove one of the sleeves off the brown shirt as i didn’t need it. I used the whole of the white shirt and used one sleeve from the long sleeved flower pattern shirt, as that was all i need in order to create my final garment.

These are photos showing the parts of garments i changed in order to create my final garment.


Final Garment
These are some pictures i've taken of my final garment i created, by using the three shirts i had chosen to create my final garment. To create a pleated texture which was the centre of attention of detail i used buttons and created button holes to create pleats.

 Front View

 Back View

 Right Side

Left Side

Creative Approaches To Fashion: Three final garments i chose

The three garments i decided to choose were three shirts, which were slightly all different textures, different styles and colours. I decided to choose shirts as they were easy to use to create pleats that would stay in place as i felt that using shirts with buttons on fitted in well as i could alter the way the buttons were positioned or take buttons off and rearrange the shape of the shirts to make it more interesting.


Creative Approches to Fashion: Research and Design Ideas

Research

In order to start my research i had to choose a word and artist/designer from the list given on my brief. I decided to choose the word "Button Down" and an artist called "Tord Boontje".


Design Ideas

In total i had drawn eight final design ideas, which gave me a wider range to choose from in order to pick one for my final design idea.


Creative Approches to Fashion: Week 4 Fabric Workshop

Fabric Manipulation Techniques

During week 4 i experemented and further developed my fabric manipulation techniques by creating samples based on my research to create possible garment shape ideas as well as texture.

These are some of the samples i created for my research using the new and old technqies i had learnt from the fabric workshop.

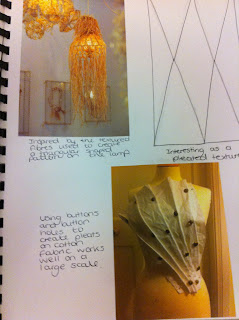
For this sample i tried creating pleats by creating button holes once i folded the fabric and sewed a button so the pleats would stay in place. I though it would be interesting using buttons to create pleats as it links in very well with my theme.

For this sample i thought about layering over curved shaped fabric strips by using buttons and button holes to hold the layered strips in place, i created a large sample which i arranged on a mannequin this gave me further garment shape ideas.

For this sample i thought about changing the overall shape i isolated by twisting it slightly, as well as creating pleats and sewing buttons onto it to hold the pleats in place. I thought this technique was interesting as it looked interesting in this satin material, which i used to create my sample.


For this sample i made button holes on the strips of fabrics and sewed buttons on so i could attach the strips of fabric together to create a diamond shaped outline as you can see form my sample above on my research page.

Creative Approaches To Fashion: Week 3 Isolating Shapes

Isolating Shapes

During this workshop i chose images from my artist research as well as my own photos i had taken for my research. By looking at research i chose parts of shapes and then placed them on an illustration in different ways and styles by cutting parts of it out, layering it up, collage, folding to create pleats and changing the position of it e.g. turning it upside down. By combing different shapes created many possible garment shapes which could be taken forward and then further development.

Here are some of my research sheets I did which show how I isolated shapes to create interesting possible garment shapes. By isolating shapes enabled me to take some of these possible garment shapes forward into possible design ideas.


As you can see from my research pages i isolated shapes from researched images and own photographs i took related to my research topic. I took the shapes forward by developing them further by creating samples and arranging them on a mannequin to give me ideas of possible garment shapes.


Creative Approaches to Fashion: Week 2 Experimenting with different media to create illustrations

Experimenting with different media to create different illustration styles based on personal favourite outfits
 My task was to create a range of fashion illustrations using a range of different media to create different illustration styles in order to further development my drawing skills. By doing these tasks I’ve benefitted from it as it’s helped to identify and bring forward new and old techniques I’ve learnt and how i can stylise them into my own style of drawing fashion illustrations.
Here are a range of fashion illustrations i did during this session:
These are four of my favourite hand drawn fashion illustrations.
 Media: Fine liner and water to create textured effects on garments and to draw illustration.

Media: Used Fine liner and food colouring.

 Media: Used Fine liner.

Media: I used fine liner, paint and sewed on to the illustration to create interesting textures onto the garments.
These are the illustrations i decided to take forward by scanning them onto photoshop and changing the appearence of them such as changing the colour, adding layers and changing the filters.

Photoshop Illustrations


These are four of my favourite photoshop illustrations, I added filters, scanned in parts of images to create layers on to the illustration, changed the colours reversed colours to create neon coloured illustration.

Creative Approaches To Fashion: Week 1 Fashion Illustration Workshop

During fashion illustration workshop we had to draw a range of half scale mannequins which had pieces of clothing and objects arranged around and on it. I also had drawn parts of full scale mannequins that featured clothing arranged on it. Here are a range of illustrations I’ve drawn in the workshop, which i feel were the best ones i have drawn. By attending the fashion illustration workshop this enabled me to improve my illustration drawing skills, which has made me feel more confident in being able to draw fashion illustrations that are in proportion. The workshop has helped me to identify different techniques using different media to represent different textured fabrics, which is very useful when it comes to designing through fashion illustrations.

To create this drawing i used permanent marker pen, oil pastels as well as soft pastels to create this drawing.
By using a combination of media enabled me to create different techniques by using a wider range of mixed media.


This illustration is part of a full size mannequin that had clothes arranged on it. To draw this illustration i used a range of mixed media which were soft pastels, watercolours, marker pen, ink and patterned wallpaper. By combining different types of mixed media has helped me, to create different textures to represent the texture/colour of different fabrics on clothing.


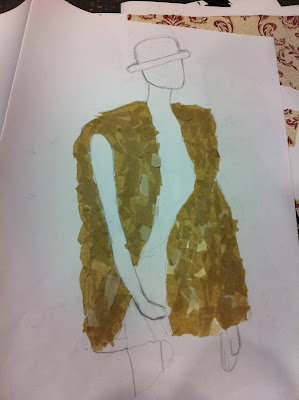
I drew out this illustration using pencil and the collaged it using brown paper to create a textured effect, as the coat i drew was a textured fur material. The brown paper works well as it creates interesting texture. I didn’t manage to finish off this drawing as i spent time creating texture, which stands out on this illustration.
This is one of my favourite illustrations I’ve drawn, using bits of ripped patterned wallpaper to create an interesting background on a white background. I mixed black ink, pencil and soft pastel to create this illustration. By using black ink as my main media it creates an interesting see through illustration that works well with the patterned background.